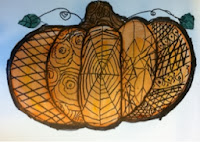
Anyways, onto the Zentangle Pumpkins! I got the idea for this from Angela Anderson Art Blog which has lots of super cute lessons!
We started out by drawing a basic pumpkin two different ways, from the inside out and outside in. Inside out is staring with an oval then adding C's to the sides. Outside in is starting with C's, working your way in, then connecting them with an oval. It was incredible to see how some kids did better inside out and others did better outside in. Everyone is truly different and there are several different paths to get to a final result, none of which is right or wrong.
After sketching our pumpkin lightly on a watercolor canvas the girls set to work first putting an even coat of orange all over, going back with more orange in the cracks to create shadows and then putting a hint of yellow in the middle of each bump for highlights.
While those dried we practiced making some zentangles. Zentangles are designs and patterns that are drawn intuitively. Meaning that it is marks that just flow naturally from you. We practiced starting with basic shapes like X's or wavy lines and building on them. Here is a few one girl came up with.


No comments:
Post a Comment