Thursday, July 24, 2014

Jennifer Mercede inspired Giraffes

If you've seen her work  then you know it is fun, funky, playful and definitely colorful! Jennifer Mercede is super talented and I was so pumped to try out one of her paintings with the kids. 


Here is the link to see or shop for more of her work! https://www.etsy.com/shop/jennifermercede 

I made the kids a step by step sheet of two of her giraffes and let them try drawing. After that they did their own, mixing elements from each and some of their own pizzaz like glasses, lips, and even a unibrow!


We first painted or canvases with golden fluid acrylics by just dripped directly onto the canvas, sprayed with water and swirled around with a foam brush. This dries speedy fast. Then they used black paint for their giraffe, starting from the top and working their way down. Since her style is really free and childlike with its scribbley look, we weren't focused on perfect shapes.


Choosing the 3-5 colors they wanted and painting the spots is various designs. I have the kids LOTS of freedom with this lesson and let them do whatever their hearts desired on their giraffes spots.


And I have to admit this was a great call! I love the variation! Lastly, finishing up by reoutlining in black and signing their names. 


Tuesday, July 22, 2014

Jasper Johns inspired Numbers

My third class of the summer is titled Messiness and it is that for a reason! All these projects will have the kids going home with not only paint on their canvas but more than likely their hands as well.

This first lesson came straight out of my art journal.
Which is obviously inspired by Jasper Johns. 

 We looked at several of his paintings and even one of my previous students work from last years project inspired by him. 

Diving straight into finger painting our canvases using primary colors, none of the kids opted to use paint brushes. Surprise, surprise lol


While those dried outside in the Oklahoma sun, we used oil pastels to draw out our number. I had the kids pick a number that had some significance whether it be the number of people in their family, their age, or amount of letters in their last name. 


Once they had their final shape, they cut it out.


Next using the number as a stencil, they dabbed white paint all over the canvas. This prevents the number from moving about an creates a cool texture. 

And here they are! 


Thursday, July 17, 2014

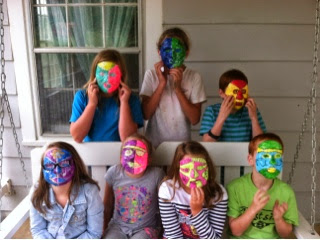
Mask making

One of my favorite books to read when I was a classroom teacher was Teach Like Your Hair's on Fire by Rafe Esquith. This inner city elementary teacher had some of the greatest (and funniest) lessons. The mask making comes straight out of his book. 

What you need: 
-Plaster Cloth cut in 1in x 4in you can get at any craft store or at Dick Blick
-Bowl of warm water
-Towel & paper towel
-Vasaline 
-Straws 

First off, put vasaline on eyebrows and eyelashes to prevent them from being ripped off. 

Then, have a kid lay flat in a table and put straws in their nose. Dipping one strip at a time in the warm water, ringing it out a hit and placing them on the kid's face, it is best to have an assistant that will wipe away excess water that can drip down into ears. Cover the face in several layers of strips. 


I've found it best to smooth out the entire mask with your fingers. This will make painting easier later on. 


These will take about 15-20 to dry.
Once they are dry, have the kid wiggle their face a bit and pull the mask off. They won't be completely dry for several more hours so have a newspaper wadded up to set it on. 


After a day or so have the kids paint the mask. 


And after we snapped this, the cheesy lines started rolling like...
"I forgot to smile!"
"Wait, I think I may have blinked!"

Tuesday, July 15, 2014

Toucans

I'll be the first to admit, one of my pet peeves is a cookie cutter lesson, meaning that everyone's art turns out looking exactly the same. 
Not a fan. 
You might as well pass out coloring sheets. 
Rant over. 

This lesson is a perfect example of non-cookie-cutterness (I may have just created a new word) For the third day of our Around the World class, Deep Space Sparkle came through once again! 


After several practice sketches with different toucan placement, they picked out their favorite and painted their bird's outline. Baby wipes (which are abundant in my house with two in diapers) are really handy for this part just in case a beak needed an alteration. As long as the paint is still wet it will wipe away pretty easily. 


Working on the background first.


Then giving their toucans some splashes of color and lastly reoutlining in black paint.


Toucans that are as individual as they are! 


Thursday, July 10, 2014

Scrolls

Day two of our Around the World class was a bit of a juggling act. With 3 centers, two of which would be projects that wouldn't be finished until next week. Here is the project that we could and did finish. I got the idea from the book Map Art Lab.

Scrolls of our lives 

We used:
Colored paper
Bleach
Qtips
Twine
Driftwood
Paint marker
Beads
Paper to list 10 life events and doodle pictures beside.

First the kids decorated a piece of drift wood using paint markers.

Then, they listed out 10 things that happened in their life on a sheet of paper and drew a picture beside as many as they could as a symbol for that event. For example if they moved they drew a house, if they became an aunt they drew a baby, if they went on vacation they drew something they did on vacation, if they had to go to the hospital because they stuck a bean up their nose....they drew a bean and a nose....which was actually one of the kids life events!

Next, using a qtip dipped in bleach they drew out their symbols in chronological order on the colored paper. I used a big sheet of construction paper from Hobby Lobby which I cut into 4in x 2ft strips before hand but you could just do regular construction paper cut in half.


They punched two holes in the top and one in the bottom of their paper. Also, an arm lengths piece of twine was used to attached the top to the stick and a forearms length of twine for the bottom.  Beads were tied on to the ends of the twine with knots to keep them in place.


And here are the stories of their lives all unrolled :)